Dress

Buffalo Plaid Dress [Simplicity 8090/Vogue 9237 hack]

October 02, 2017

This dress came together from a number of different sources of inspiration. Current trends and garments/patterns that I've seen recently merged into one hack of a dress.
Inspiration, clockwise from top left: Jack Stitch Handmade's Vogue 9237,@nikidoesstuff_'s awesome shirt with tied sleeves, Erica's S8455 with tied sleeves and neckline, Caroline's Marthe

I saw Erica's blouse post just as I was finishing up this dress. It was a total confidence boost that my design elements weren't off-track. Erica is always on top of the trends.

Jackie advised me that the Vogue pattern is very hack-able. I mean, it's an A-line dress with a butt ruffle. I couldn't justify spending $5 on a Very Easy Vogue pattern for that. And yes, I am calling that design feature on the back the "butt ruffle"
I started off with the Simplicity 8090 blouse pattern. It was the best pattern I could find in the stash with the right silhouette and sleeves. The envelope features a version in a large gingham which confirmed that the buffalo plaid would work with the style. Also, I've made it twice and I knew that the fit was okay. However, I did adjust the armscye and sleevehead based on fitting work I did for my yellow seersucker dress. And I extended the sleeve to bracelet-ish length. I also pivoted the dart up several inches. And of course I cut the back on the fold. No need to match more plaid than necessary.

From there, I extended the front to dress length. And I slightly increased the width of both front and back below the dart to make it even more trapeze-y.

The Buffalo Plaid: Surprising nobody, I didn't buy this fabric for this project but pulled it from the stash. Mom bought this a while ago for baby blankets, but she was graciously willing to sacrifice it since she already has a stock of baby quilts on hand. I had about 2 1/2 yards but it's only 45" wide and despite my best efforts there was no way to fit all my pieces on with the selvedges folded together. Instead I cut it all on the cross-grain. Crossing my fingers that I don't regret that later after multiple washes and wearings. I was able to cut the hems of the sleeves and butt ruffle on the selvedge edges, so I didn't need to finish them at all!

I don't think I've ever cut and matched a plaid like this before. I've done some gingham on a small scale, but matching this plaid was daunting. It sat on the cutting table for two weeks before I was brave enough to go at it with the scissors. I was surprised by how not-horrible the cutting process was. I cut the fabric one layer at a time, making sure to align my plaids before cutting the second layer. It turned out great, and my plaid-matching is better than I could have hoped for.
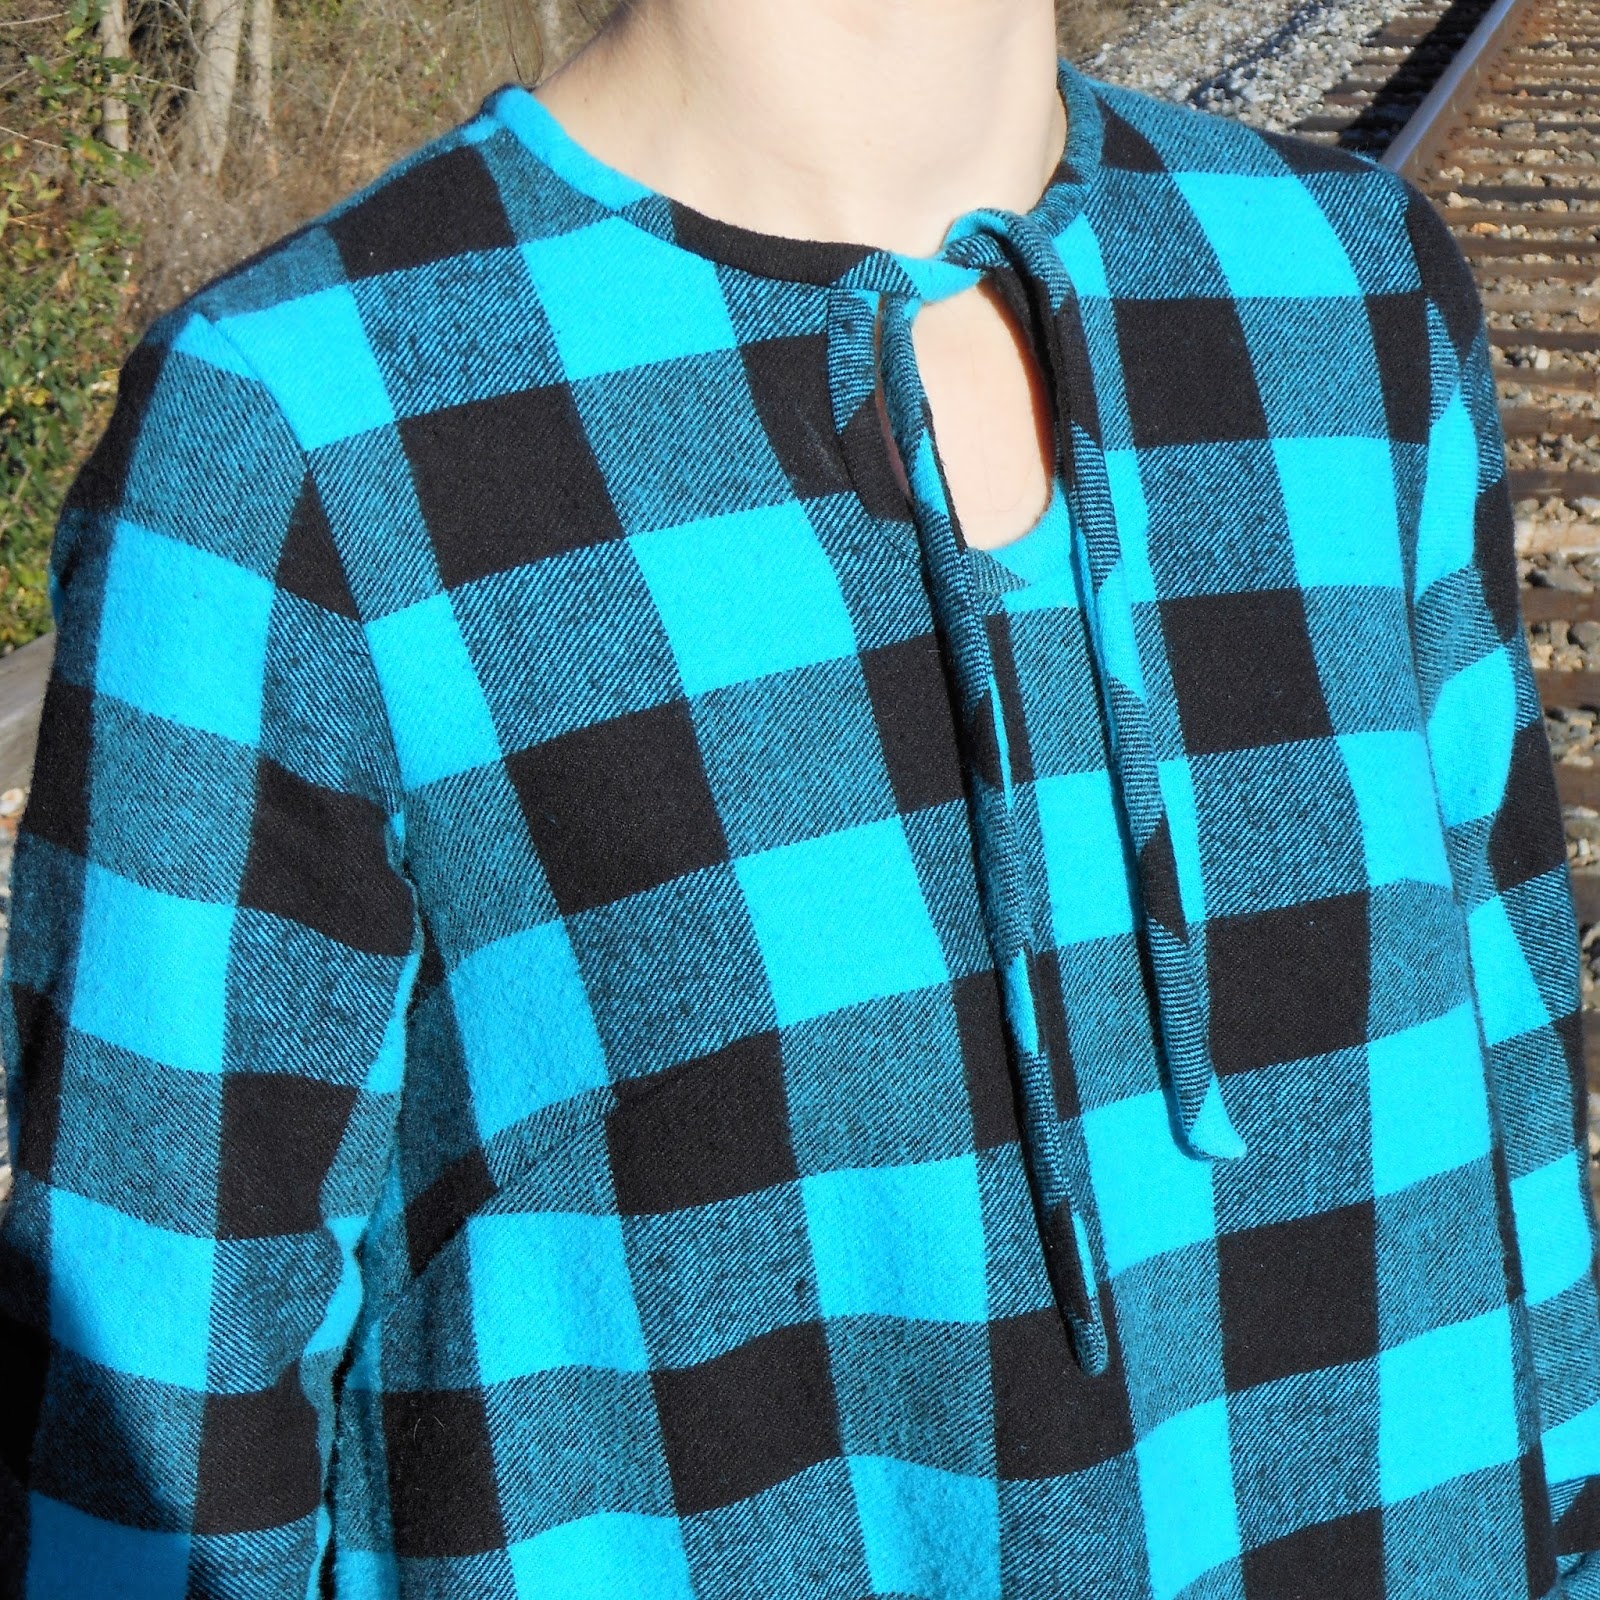

Keyhole neckline: I estimated the depth of the keyhole based on how wide I needed the neckline to be to fit over my head. I had sketched a line on my pattern tissue and ended up cutting it narrower, but I think I could have gone even narrower. The rest of the neckline is cut from 8090, with the binding stitched on top of the blouse's stitching line. All of the neckline is bound in 1 1/2" strips cut on the bias.


Sleeve ties: The sleeve ties are 1" wide finished, bias-cut. They are inserted into the sleeve seam, about 4" from the hem.

Butt Ruffle: The butt ruffle is about 60" long and 10" wide. That was the longest I could make it after cutting the front/back pieces from my limited yardage. The ruffle is just a rectangle, but since I cut a curve on the back I have a very slight mullet effect. Evenly distributing gathers is one of my least favorite sewing tasks. Soooo many pins.


Ultimately, I made a very comfortable, sorta trendy dress. I'm not usually one to hop on the trend-wagon quickly, but this works for me! Is it a better use for this fabric than a baby blanket? The jury is out. I have certainly reduced the cuteness potential.


Follow my blog with Bloglovin

PS: This totally counts as a #SewMyStashSeptember project. I bought nothing at all! Fabric, pattern, and all notions were from the stash! And I just barely finished it before the end of the month.

Dress

Autumnal dressing- Simplicity 1755

September 22, 2017


Welcome to Fall in the northern hemispheres! It's feeling more like summer around here, as we're back to 80 degree days. But the leaves are changing colors, so it's a perfect time to share one of my favorite autumn dresses. I think of it as an "autumn dress" both because of the color palette and the longer hemline and sleeves to ease into the cooler months. The design and fabric choice is also perfect to bridge the business casual/business professional dresscodes I often flip between at work. One of my bosses said that the plaid looked just like one of his favorite suits!

This dress was finished in the Spring of 2015. I wasn't sewing much at the time, so this is a mommy-made garment. Mom and I had a pretty sweet deal at that time. I picked out the fabrics and patterns, provided encouragement, and presented myself for fittings, and she did all the sewing and cutting and finishing. She wasn't too happy that I made her put an invisible zipper in this, but she did a great job!


The pattern is the now discontinued Leann Marshall for Simplicity 1755 . The purchase of the pattern was largely inspired by Dixie DIY. I totally copied (or instructed Mom to copy) her idea to cut the front on the fold. What a relief to avoid matching the plaid.

A few construction notes:
  • The bodice is lined, but not the skirt. I tend to wear a full length slip with this dress. 
  • We skipped the waistband/belt/bow bit. Aside from the waistband riding lower than I like to have my waistline, I thought a bow would be too twee for workwear. I always wear it with this thin leather belt. 
  • The plaid is a suiting fabric from Field's Fabrics. I can't remember the fiber content, but I think it has some wool in it. The eggplant for the sleeves and collar is a wool suiting from The French Seam. 
  • Those pockets hidden inside the pleats are fantastic. We enlarged them a little bit so I can easily fit my phone. 

Fitting notes: 
  • As usual, we cut a 10 in the bodice and a 12 at the hip. Pretty standard Big 4 sizing for me. 
  • We also raised the waistline (1/2 inch maybe) and took in the seam at the top of the sleeve to raise the entire bodice (About 1/4 inch). 
  • Mom would like to point out that the raglan sleeve was an unexpected challenge for fitting. We both have more experience with traditional set-in sleeves, so we had to do some research on how to adjust the fit of the raglan. 

Overall, I'm very happy with this dress. The fabric choice emphasizes the professional appearance of the collar and the silhouette is very classic, but the raglan sleeve and pockets jazz it up. The muted colors look much nicer, in my opinion, than the brights used on the pattern envelope. And a proper suiting fabric elevates this over some versions I've seen made with quilting cottons. We made up another version in a navy blue suiting that I'll get around to sharing someday.

Butterick

Butterick 6101- A Positive review

September 13, 2017


It has come to my attention that many people have shared negative reviews of the Butterick 6101 Katherine Tilton tunic pattern, or have been unsatisfied with the results. I would like throw my two cents into the conversation and suggest how you, too, can successfully sew up this awesome pattern. I made mine up last Fall, and it was in regular rotation throughout the Fall/Winter/Spring. I'll be pulling it back out before long.

Before I get into my tips, a brief review. Butterick describes the pattern as "Loose-fitting pullover tunics have collar, left side pocket detail, sleeve variations, hem band and top stitching." However, there are awesome pocket details on both sides, not just the left. I don't think any written description can do justice to the amazing designs of the Tilton sisters. They are the epitome of art-teacher chic.


This pattern is fantastic, as I will say many times throughout this post. The pockets come together like magic. It has an unusual shape you don't often find in stores. Butterick lists the sewing rating as "Average". I would call it Adventurous Intermediate. You must have a good grasp of the spatial reasoning that goes into sewing (seeing how flat pieces are seamed into 3D garments), attention to detail, and a level of comfort/confidence when sewing with knits. If I had to change one thing about this I would take a bit of width off the back shoulder, but I can't see it when I wear it so it doesn't bother me that much.


Now. Here's my advice if you are adventurous enough to try this. You must make good choices regarding size selection and fabric.

Mistake #1: Bad fabric choices. The pattern calls for "lightweight woven and stable knit fabrics.FABRICS: Linen, Jerseys, Challis." If you try to use ponte knit or sweatshirt fleece, you're going to have a bad time. Just look at the photos on the cover; they all feature extremely drapey fabrics. That's what you want for this, a fabric which will drape closely to the body to balance the volume of the design. There are a lot of seams below the bust, and if you use a fabric with lots of body, and then layer it up through the seams, you're going to end up with stiff seams that don't lay nicely against the body.

I used a lightweight, almost sheer, poly/cotton burnout jersey. For a close-fitting top this fabric might be too lightweight, but the volume and drape of the tunic balance that out. The drape also conceals the pockets, the most interesting feature of this pattern.


Mistake #2: Size selection. This pattern gives you the option of using a knit or a woven. View B on the envelope appears to be a very lightweight linen blend. While I'd like to make something like that in the future, let's talk about sizing for knits since most people have chosen that option. You will likely want to cut a size that has very little ease. For reference, I typically cut Butterick patterns at around a 10, maybe sizing up to a 12 at the shoulder or hip depending on the style. For this garment, I made the XS, which is a 4-6 by Butterick's standards. It is still very roomy. The pattern has built in about 7" of ease at the bust and 10+ at the waist. I sized down and still have over 5" of ease at the waistline. When choosing your size, take a tee that fits you well and compare it to the flat pattern measurements at the shoulder and bust. I can imagine that unless you normally do a significant FBA, you could size down throughout the body, perhaps grading up at the shoulder if necessary. This is not a pattern that is easy to "take in" after you've basted it together, so take the time to consider the sizing before you cut. All of the pieces except the sleeves and neckband are unusually shaped, so you won't be able to easily adjust on the fly.

Also regarding size, think about your height! I think the pattern as drafted is a good tunic length for those 5'4" and taller, but it might be overwhelming on a shorter person. (Unless you have the bust to fill it out. I clearly do not). You will need to adjust for this before you cut, as the hem is shaped. If you need to take off (or add) length, you will have to do it around the waist area, above the pocket pieces. The pattern doesn't have lengthen/shorten guidelines so it will be a bit of extra work to take the length off evenly all the way around.

I hope to see many more versions of this tunic as we head into fall here in the Northern Hemisphere. Just remember to make fabric and size selections that are appropriate for the pattern and you'll improve your chances of success. If you have made this, please share it with me!


HomeDec

Flannel "Chenille" Pillow Cover

August 27, 2017


I'm not crazy about home-dec, but I do appreciate a good collection of throw pillows for my bed or couch. There's nothing better than a fluffy pillow to rest your head on while binge-watching your favorite show. It's a big plus if that pillow is covered in something washable, for when you inevitably spill your binge-watching snacks. Don't lie, you do it too. I started building a "wardrobe" as it were of white-ish throw pillows maybe two years ago. Some are store-bought, but the best ones are self-sewn. The most recent addition is this faux-chenille cover for an oblong pillow. (The faux-sherpa and pom-pom trimmed pillows are also handmade. Thanks Mom!)


Fake chenille is a super-easy way to upgrade plain cotton flannel. My pillow form measured 14" by 28", so I cut four rectangles 15" by 29" for a half-inch seam allowance. I spray-basted the layers together and marked my stitching lines with my handy chalk wheel. The stitching lines are at a 45 degree angle from the sides, a half inch apart. I tried to use the stitching guide on the walking foot to free-hand lines after stitching the first chalked line, but that didn't go so well. I chalked a few lines at a time to ensure that the chalk didn't wear off with handling. Between the spray basting and the walking foot, the stitching went quickly and smoothly in just an hour or two.


The next step is the scariest. Cutting the "chenille". Luckily, there's a handy tool made especially for this job that just happened to be hanging out in the stash. This Clover rotary cutter (I used an older version) has a guard on the bottom so that you only cut through the top layers of your flannel. I used scissors for some of the shorter strips at the corners, but you could use scissors for the entire thing. Just make sure you are only cutting the top 3 layers, leaving the base layer intact to hold it all together.


From there, I constructed the pillow backing with the same flannel, inserting a zipper about 6 inches in from one end. I honestly just eyeballed this so I don't have all the measurements. I sandwiched the front and back RST (with the zipper open), stitched around the edges, and flipped. I ended up taking about 1 1/4" off the length of the pillow cover to take care of some limp corners. So finished dimensions are about 14" by 26 3/4"

The real magic happens when you put this through the washer and dryer. I ran it in a load with towels and the bias-cut edges of the flannel fluffed up for a super touchable effect. Don't wash it alone, as you want the friction to wear at the cut edges. It will only get better as it's used and washed.


This pillow is all ready for the Season 7 finale of Game of Thrones tonight!

A couple notes if you decide to try this for yourself. Use a decent quality flannel. No need to get the heavy-duty apparel flannel, but they sell some very thin and flimsy flannel which will just fall apart in the wash. Use a short stitch length for the chenille strips, again so it doesn't fray into nothing at all. Don't use printed flannel as the ink will prevent it from fraying evenly.

Butterick

DIY Gingham Flounce Skirt

August 13, 2017

My finished gingham skirt


If you follow any fashion bloggers or Instagrammers, you will have seen a million gingham flounce-y or ruffled skirts this year. It seems that all of the fast-fashion shops sold a variation on the trend. I was sucked in by the gingham, but not willing to shell out the money for a trend that's likely to fade quickly.

I knew I could sew it myself. McCall's released a pattern that closely resembles the midi/maxi length (M7606). I was aiming for the mini version, and I knew that with some pattern hacking I could use any straight skirt pattern from the stash. Actually, almost all of this project came from the stash.

I started with Butterick 6287 from 1992. Mom has made the skort view (probably closer to 1992 than today), but I had my eye on the faux-wrap view B.

Butterick 6287 from 1992


I only cut the back, front, and wrap pieces. I also cut them a bit shorter than the pattern considering I'd be adding a few extra inches to the hem with the flounce. The pattern includes a waistband facing, but I had other plans. If you start with a plain skirt pattern without a wrap piece, you could easily create your own. Just cut out an extra of the front piece and cut a gentle curve from the hem at one side to about 2-3 inches in from the other side at the waist.

I drafted the flounce from scratch. After stitching together the body of the skirt, I measured the length of the hem. I started at the front under the wrap and continued all the way around the back and up the wrap to the waistband. I think it was about 60". I sketched out a spiral about 28"diameter. The spiral strip starts at about 4" at the outside and gradually narrows to about 1.5" at the center. I was very pleased that on the first attempt the total length of the strip was a few inches longer than the hem length I measured off my skirt.

My flounce pattern, on kraft paper


I won't go through all the construction details, as I didn't take pictures during the process. I didn't even pull the instructions out of the pattern envelope. Basically, I hemmed the flounce, stitched it onto the skirt with a bit of gathering at the front for extra volume. I finished my seams on the serger. I inserted a coordinating brown zipper in the back. That was another stash pull, so that brings me up to three stash items in the project; pattern, fabric, and zipper.

Detail of flounce/ruffle on faux wrap


For the waistband, I wanted to try out a grosgrain ribbon facing. I bought a spool of brown ribbon with a cute white stitching detail. Of course, I didn't realize until I pressed the waistband that the stitching was just printed on and peeled off with heat. To attach it, I placed the back of the ribbon to the right side of the skirt and stitched along the edge. The ribbon was folded to the inside and hand-tacked to the side seams and darts. It made a quick, comfortable, and stable waistband. I would use this technique again.

The inside showing the back-zipper and waistband


Ultimately, I'm happy with the time and money I spent on this little skirt. I think this has great visual payoff and will be easy to dress up or down this summer. After all, there are hundreds of 'OOTDs' online for inspiration.


Butterick

Flamingo Jammies

August 08, 2017


Anyone have a novelty print they just can't get enough of? For me, it is flamingos. Even better if they're blue flamingos. And despite having a collection of quilting cottons in flamingo prints, I've never stitched any of them up. Of course, it's pretty hard to wear loud flamingo prints out of the house on a daily basis. Solution? Pajamas!

Despite bookmarking the Closet Case Carolyn pattern the day it was released, Butterick was on sale. And I didn't have to print and tape pattern pieces. 


But of course, nothing can be that easy. The length of fabric I pulled from the stash was not quite big enough to fit all the pattern pieces for the shortie pajamas. I managed this in two ways. First, I traced the back yoke of the shorts onto the main short piece to eliminate fabric wasted in that seam allowance. It looked like there really wasn't any shaping in that seam anyways, and in a loose short like this there's no fitting lost. Second, I cut some of my pieces from a coordinating solid. I think this also helped to really make the print pop. 

I used the Cloud 9 Organic cotton in Turquoise for the under collar, front facings, back, left front, waistband, pocket, pocket facing, and arm and leg bands. And yes, I did draft up a complicated color-coded checklist to be sure I was cutting each piece in the right direction from each fabric. 

Assembly went fairly smoothly. I decided to add black piping at the last minute. Luckily there was just enough of it in the stash. That added a bit of extra work with hand-basting the piping, but I think the effect is fantastic. I also used black topstitching.


Sizing: I made a 10 in the top and a 12 in the bottom. This is pretty standard for me in Big4 patterns. With a loose fitting top and elastic shorts, no additional fitting was required. I did measure the elastic against my own waist as opposed to using the elastic cutting guide in the pattern, but that's standard protocol for me. 

Pattern Notes: There are two places in the pattern as-drafted that I might adjust when I make these again. First, the front facing is too short at the top. I clipped and folded the inner collar as marked but it fell probably an inch short of the unhemmed facing. Second, the pockets hang very low. Since the shorts tend to get wrinkly, the pockets will often stick out the bottom. I can see the extra large pocket being useful for those with giant phones, but I just don't need that much pocket! (And yes, I'm very surprised to be saying that)

Would I Sew this Again?: Absolutely. This is a classic PJ pattern, which was notably absent from the stash. This is a great alternative to the Carolyn, and with some minor adjustments (curved hem and mock fly) you could get pretty close to that look. 

Popular Posts