HomeDec

Flannel "Chenille" Pillow Cover

August 27, 2017


I'm not crazy about home-dec, but I do appreciate a good collection of throw pillows for my bed or couch. There's nothing better than a fluffy pillow to rest your head on while binge-watching your favorite show. It's a big plus if that pillow is covered in something washable, for when you inevitably spill your binge-watching snacks. Don't lie, you do it too. I started building a "wardrobe" as it were of white-ish throw pillows maybe two years ago. Some are store-bought, but the best ones are self-sewn. The most recent addition is this faux-chenille cover for an oblong pillow. (The faux-sherpa and pom-pom trimmed pillows are also handmade. Thanks Mom!)


Fake chenille is a super-easy way to upgrade plain cotton flannel. My pillow form measured 14" by 28", so I cut four rectangles 15" by 29" for a half-inch seam allowance. I spray-basted the layers together and marked my stitching lines with my handy chalk wheel. The stitching lines are at a 45 degree angle from the sides, a half inch apart. I tried to use the stitching guide on the walking foot to free-hand lines after stitching the first chalked line, but that didn't go so well. I chalked a few lines at a time to ensure that the chalk didn't wear off with handling. Between the spray basting and the walking foot, the stitching went quickly and smoothly in just an hour or two.


The next step is the scariest. Cutting the "chenille". Luckily, there's a handy tool made especially for this job that just happened to be hanging out in the stash. This Clover rotary cutter (I used an older version) has a guard on the bottom so that you only cut through the top layers of your flannel. I used scissors for some of the shorter strips at the corners, but you could use scissors for the entire thing. Just make sure you are only cutting the top 3 layers, leaving the base layer intact to hold it all together.


From there, I constructed the pillow backing with the same flannel, inserting a zipper about 6 inches in from one end. I honestly just eyeballed this so I don't have all the measurements. I sandwiched the front and back RST (with the zipper open), stitched around the edges, and flipped. I ended up taking about 1 1/4" off the length of the pillow cover to take care of some limp corners. So finished dimensions are about 14" by 26 3/4"

The real magic happens when you put this through the washer and dryer. I ran it in a load with towels and the bias-cut edges of the flannel fluffed up for a super touchable effect. Don't wash it alone, as you want the friction to wear at the cut edges. It will only get better as it's used and washed.


This pillow is all ready for the Season 7 finale of Game of Thrones tonight!

A couple notes if you decide to try this for yourself. Use a decent quality flannel. No need to get the heavy-duty apparel flannel, but they sell some very thin and flimsy flannel which will just fall apart in the wash. Use a short stitch length for the chenille strips, again so it doesn't fray into nothing at all. Don't use printed flannel as the ink will prevent it from fraying evenly.

Burda

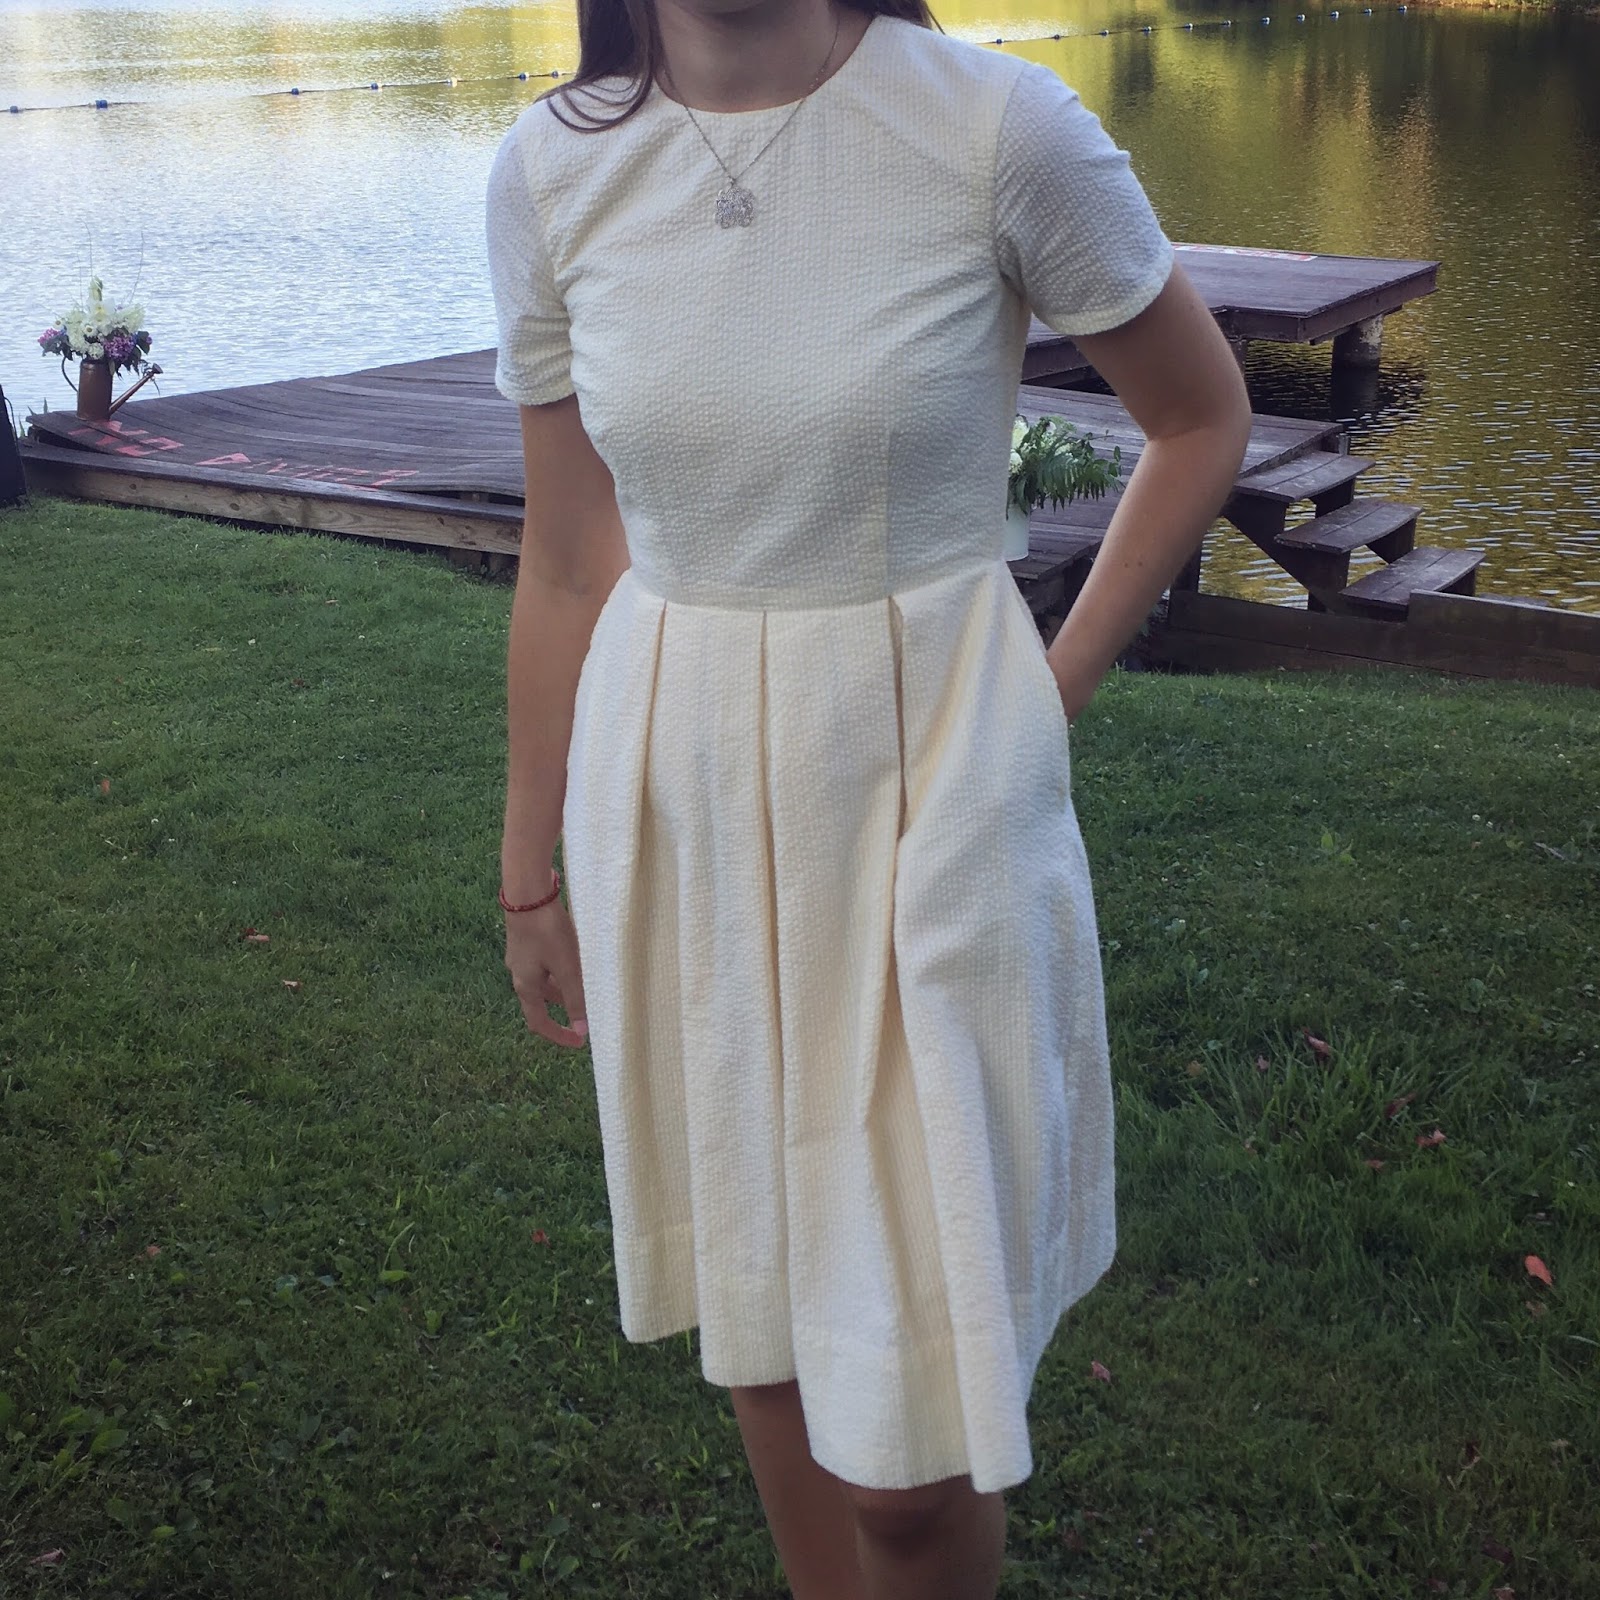
Yellow Seersucker Dress

August 20, 2017


I put this dress together for a July wedding. It had been a while since I had a new dress, since I don't wear them often. I'm a big fan of separates. And pants. There were three things that came together to finally check this off the to-sew list. 

#1- The yellow seersucker. I picked it up at Hancock Fabric's long before they closed. I would guess probably around 2013. Back then I did not have as much time to sew, and I wasn't as confident as I am now. Not that I'm an expert, but I can insert an invisible zipper without too much yelling. I'm crazy for seersucker, so the yardage was too precious to waste on a project that I might not be able to wear.

#2- This pleated short-sleeve dress from Riva la Diva. I was digging through her archive a few months ago and it caught my eye. I quickly picked up the Burda pattern and started making a toile, but I was discouraged as I struggle to get a good fit out-of-the-envelope on most close-fitting patterns. I have a length of denim earmarked for a look-a-like, but the pattern still needed some work. 

#3- Allie Jackson live-blogged through Instagram stories her process of developing a custom fitted bodice block. Check out her summary here.  As she was going through the various modifications she was making to her block, I recognized her fitting issues in my own bodice. This gave me a good list of the areas I could look at to improve my fit. 

Ultimately, I ditched the bodice from Burda 7034 in favor of Simplicity 1419. It has waist and bust darts at the front rather than just the waist darts. The back fit well enough after grading between sizes, but I worked very hard to get the front to fit better. I did a slight forward shoulder adjustment and a couple SBA techniques. I found my favorite use for Pilot Frixion pens; marking up my traced pattern for each toile, and then erasing the parts that didn't work with my iron. I only had to trace it off the tissue once, and there weren't too many markings cluttering my pattern. There were no fewer than four toiles before I cut into the seersucker. I think in the end I may have over-fit the front of the armscye, but it's still better than anything I've sewn before. 

I had intended to still use the Burda pattern for the skirt. Not until I laid it out on my fabric did I realize that it called for 55" width fabric and my seersucker was only 45". This was a hidden blessing though, as the Burda skirt's pleats wouldn't have aligned with my Simplicity darts anyhow. Late at night, I carefully measured my bodice and calculated the width of the skirt panels for the appropriate pleat intervals. The layout of the pleats is the same as the Burda but with narrower 3" pleats. I slept on it and double-checked my math in the morning (with coffee) before cutting the fabric for the skirt. The Burda pattern did end up in the final product; I cut the pockets using the Burda pattern piece. 

I lined the bodice and skirt with a lightweight pale yellow material. A burn test concluded that it's most likely polyester. Yuck. I was concerned that the poly would take away all of the breathability of cotton seersucker, but I needn't have worried since the day of the wedding was a chilly one. The lining is pleated with the seersucker on the skirt, but the side seams and hem are loose. I machine stitched the lining at the neckline, but everywhere else was hand-sewn. I cut it close on timing, but the dress was hemmed and washed before we had to leave town for the wedding. 


Denim Romper

August 18, 2017


I got it into my mind that I needed a denim romper with a button-up shirt style top. Instagram is a great source for sewing inspiration. The first photo I saw was this....


I also liked these.....

I started with McCall's 7330. It has good reviews and some promising results (see Erica Bunker's awesome jumpsuit) However, I knew that I wanted a real button-up front, not that silly thing they do on women's clothes that widens into a V-neck at the top causing the collar to not meet at the front. Straightening out the front was easy. Drafting a new neckline and collar, not so much. I've added collars to garments before so it wasn't an entirely new process, but the forward shoulder seam really threw me off. My finished collar went together smoothly, but I'm not 100% pleased with how it sits. I think I could have made the back neckline higher, and the front neckline lower. Oh well. 


You can see the buttonbands here. I changed these up as well. After studying denim shirts in stores and in family members' closets, I ditched the pattern's buttonband construction. I extended the left front 2.5" from the center front. I folded 1" under twice and edge-stitched the fold. This makes a nice non-bulky band upon which to sew the buttons. On the right side, where the buttonholes go, I cut a piece 2 3/8" wide by the length of the front. This was stitched to the inside, wrapped around the front, and topstitched in place. I'm very pleased with how this turned out. I ended up with a perfect 1/8" reveal on the inside, just like a real shirt!

I really wanted the fly and the button-band to line up, like some of my inspiration garments. I spent far too many hours trying to figure it out before I concluded it was impossible. The fly is on the center front, but the buttonband is centered on the center front. I even went to the store just to open up the Simplicity 8060 jumpsuit to see how that was drafted. Mimi G has the fly at an angle from the crotch to the waistband, rather than directly on the center. While that works for that style with a drawstring waistband, it wasn't going to work for me. Instead, I just extended the waistband to give it a more dramatic tab and draw attention away from the misalignment. You can see here that I also added a fly shield behind the zipper. 

Some of the other design changes I made include adding a hanging loop to the back, omitting the sleeve and hem tabs, drafting new pockets, and generally adding a bunch of topstitching. On the sleeves and sides the topstitching secures flat-felled seams to emphasize the "denim shirt" style. 


I struggled with the fit of this garment. Based on my measurements, I cut a small in the top and a medium in the waistband and shorts. I also added 1/2" to the top length after comparing the flat pattern to rompers that do (or do not) have enough wearing ease for me. In retrospect, I should have done pattern adjustments to the small short to add some ease only at the hip/seat. After a basted fit-check I took in each side seam and the center back about 1" starting at the waist and decreasing to nothing at the hip. There is still a lot of bagginess in the legs and front of the shorts. I inserted elastic into the back waistband to get a closer fit without over-fitting or losing wearing ease. The gathering of the elastic makes it hard to see that I didn't gather the top/shorts to the waistband as instructed. Instead, I made teeny tiny pleats. This thicker denim just looked sloppy when gathered.

This was a fun project to make, and even more fun to wear. It has encouraged me to add some button-front shirts to the sewing list and to work on a pants/shorts block. 


Popular Posts